Sound Proofing
Whether it's footsteps overhead, voices between rooms or a noisy basement suite, we build customized sound-dampening systems using insulation, soundboard, resilient channel and specialized drywall to significantly reduce sound transfer between spaces.
Call Us 604-309-8317Professional Sound Dampening
Noise has a way of changing how you feel about your home.
Maybe you can hear every footstep from the floor above.
Maybe voices travel between a basement suite and the main house.
Maybe the laundry room is beside a bedroom.
Or perhaps you're building a home office, media room, bedroom or rental suite and simply want more privacy between spaces.
Whatever the situation, there's one thing we explain to customers right from the beginning:
There isn't one magic soundproofing product.
Good sound control comes from building the right system.
At Devlin Drywall, we approach sound dampening in layers. Depending on the construction of your home, the type of noise you're trying to reduce, your available space and your budget, we can combine several different products and methods to create a solution specifically for your project.
And you don't necessarily need every product available.
Sometimes a relatively simple upgrade can make a meaningful difference.
Other times, when sound reduction is extremely important, we can build a much more substantial assembly.
We'll explain the options, the costs and where we believe your money will make the biggest difference.
First, What Kind of Noise Are We Trying to Reduce?
Before talking about products, we need to understand the problem.
Not all sound travels the same way.
Airborne noise includes things like:
- Conversations
- Television
- Music
- Dogs barking
- General household noise
Then there's impact and structural noise, such as:
- Footsteps
- Children running upstairs
- Objects dropping
- Doors closing
- Furniture moving
- Bass and vibration
This distinction matters.
A system that helps reduce voices travelling through a wall isn't necessarily going to eliminate the thump of someone walking across the floor above you.
That's why we prefer to start by asking:
What are you hearing, and where is it coming from?
From there, we can start building the appropriate system.
How We Build a Better Sound-Dampening System
There are several principles involved in reducing sound transmission through a wall or ceiling.
The products can change, but we're generally trying to accomplish some combination of four things:
Absorption. Mass. Separation. Sealing.
Insulation helps absorb sound energy within the wall or ceiling cavity.
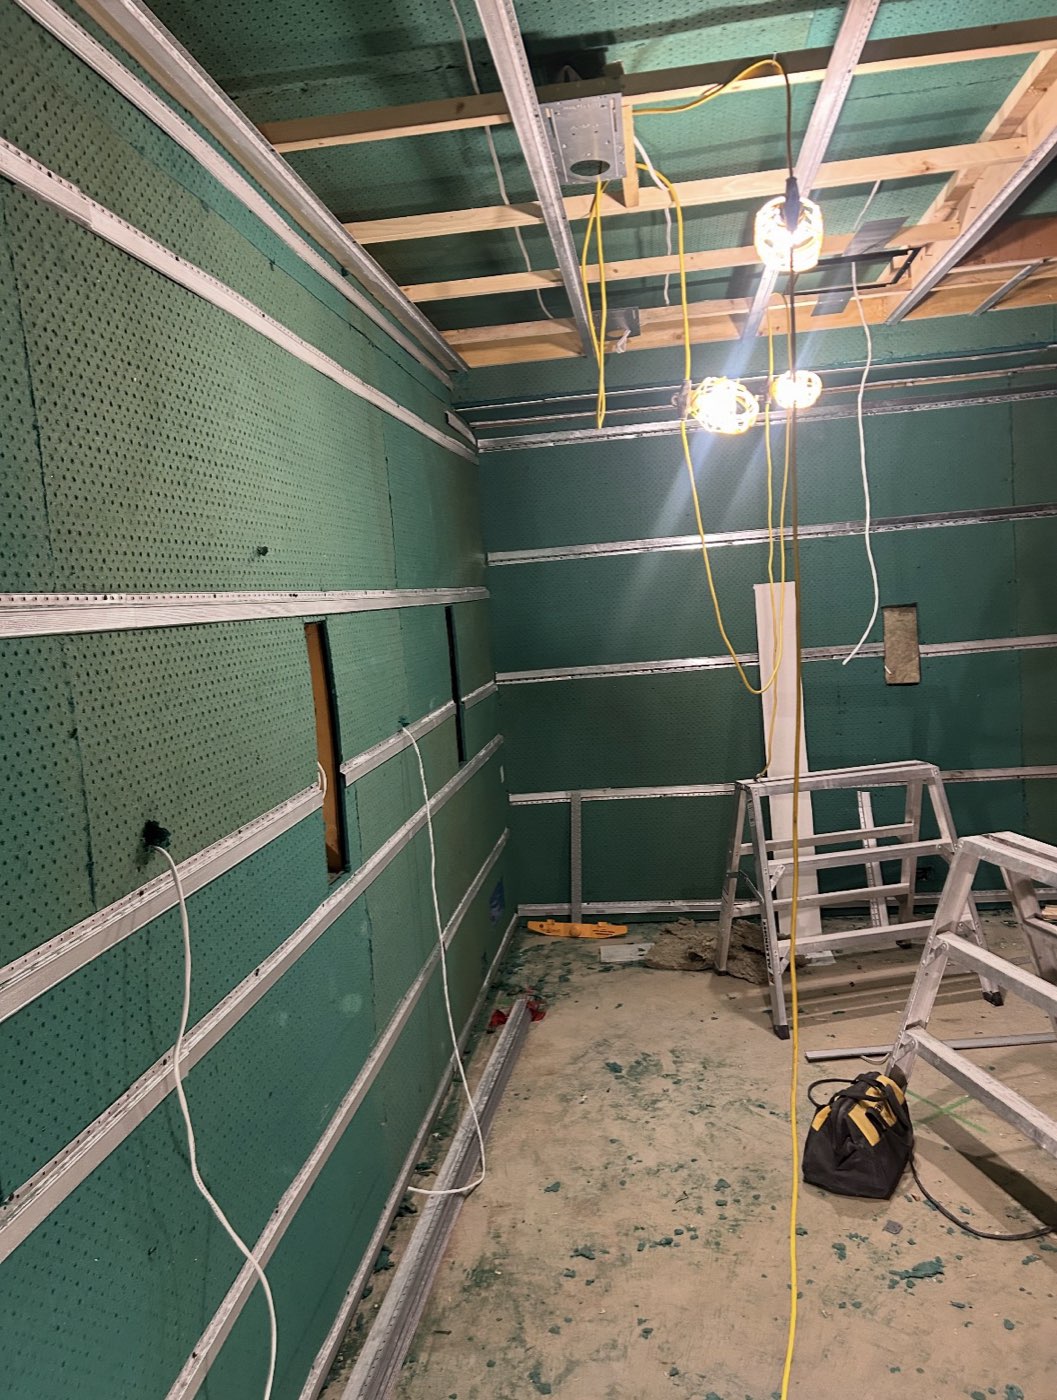
Soundboard adds another sound-controlling layer.
Drywall and specialized acoustic drywall add mass.
Resilient channel can help decouple finished surfaces from other parts of the assembly, reducing the direct path for vibration.
And acoustical sealants and careful treatment of penetrations help reduce the little openings through which sound can travel.
The important thing is that these products work together.
That's why simply adding one expensive product isn't necessarily the best use of your money.
Step 1: ROCKWOOL Safe'n'Sound Insulation
When wall or ceiling cavities are open, one of the first products we typically recommend is ROCKWOOL Safe'n'Sound insulation.
Unlike ordinary thermal insulation that's primarily intended to control heat transfer, Safe'n'Sound is stone wool insulation specifically designed for acoustic performance and fire resistance in interior walls, floors and ceilings.
Its dense fibrous structure helps absorb sound energy inside the cavity and reduce sound transmission from one space to another.
For us, it makes sense to start here.
If we're already opening or constructing a wall or ceiling and have access to the cavities, we want to address the empty space before we close everything in.
It's particularly useful between:
Bedrooms
Basement suites
Home offices
Bathrooms
Laundry rooms
Mechanical rooms
Home theatres
Floors between living spaces
It's the foundation we frequently recommend before moving into the additional sound-control layers.
Step 2: SONOpan Sound-Dampening Panels
The next product we frequently recommend is SONOpan sound-dampening board.
SONOpan is installed as a continuous layer across the wall or ceiling rather than simply being placed inside the cavities.
This gives us another component in the assembly specifically intended to help control sound.
SONOpan's manufacturer describes the product as helping absorb and reduce noise, particularly in the mid-to-high-frequency range, while also forming part of higher-performing wall and ceiling systems when combined with insulation, resilient channel and drywall.
This is where sound dampening starts becoming less about an individual product and more about layering different materials that perform different jobs.
The insulation is working inside the cavity.
SONOpan adds another sound-controlling layer across the assembly.
Then we can begin addressing structural vibration and mass.
Step 3: Resilient Channel & Decoupling
Resilient channel, often called Rez Bar on job sites, is one of the most useful components we can add to a sound-dampening system when it's installed properly.
Its job is to help decouple the finished wall or ceiling from the structure, reducing the direct path that sound vibration can use to travel through framing and into the next room.
But there's an important detail we've learned from installing these systems:
Where we place the resilient channel can depend on what other materials we're using.
We don't believe there is one arrangement that makes the most sense for every project.
If We're Using SONOpan + Resilient Channel + One Layer of Drywall
For an assembly consisting of:
Framing to Resilient Channel to SONOpan to 5/8" Drywall
we agree with SONOpan's recommended approach.
In this situation, installing the resilient channel first allows the SONOpan and drywall to remain directly together as two continuous layers, while the resilient channel creates the separation from the framing behind them.
This makes practical sense to us.
SONOpan and the 5/8" drywall work together as the finished layered assembly, while the resilient channel helps isolate those layers from the structure.
If we're only using one layer of drywall, this is generally the arrangement we prefer.
What Changes When We Add a Second Layer of Drywall?
This is where our approach can change.
Let's say we're building a more substantial system using:
SONOpan + Resilient Channel + Two Layers of 5/8" Drywall.
In this situation, we often prefer:
Framing to SONOpan to Resilient Channel to 5/8" Drywall to 5/8" Drywall
There are a couple of reasons for this.
First, we now have two substantial layers of 5/8" drywall together on the isolated side of the resilient channel.
That gives us a large amount of mass while the resilient channel creates separation between those drywall layers and the SONOpan/framing assembly behind them.
In other words, we're creating another break in the path that vibration needs to travel through.
That separation and resulting air space are things we like having within a higher-performance sound-dampening assembly.
But there's another reason that's much more practical.
The screws.
Screw Length Matters More Than You Might Think
This is one of those little installation details that can make a big difference.
If resilient channel is installed behind SONOpan and two layers of 5/8" drywall, the fastener has a lot of material to travel through before it even reaches the channel.
SONOpan is approximately 3/4" thick.
Two layers of 5/8" drywall add another 1-1/4".
That means we're already at approximately:
3/4" + 5/8" + 5/8" = 2" of material.
If we then want approximately another 3/4" of fastener engagement into the resilient channel, we're looking for roughly a:
2-3/4" screw.
And that's where things become awkward in the real world.
A standard 2-3/4" drywall screw isn't something we're typically working with. The next readily available size is generally around 3", and long drywall screws become much more difficult to install accurately and consistently.
More importantly, we don't want an unnecessarily long screw accidentally reaching the framing behind the resilient channel.
Because if it does, we've potentially defeated one of the main reasons we installed the resilient channel in the first place.
Don't “Short-Circuit” the Sound System
This is extremely important.
The resilient channel is there to help separate the finished surface from the structure.
If a drywall screw passes through the channel and continues into a joist or wall stud, we've just created a rigid mechanical connection between our finished surface and the framing.
In sound-control terminology, this is often referred to as short-circuiting the resilient system.
Instead of vibration being interrupted by the resilient channel, we've given it a direct path through the screw and back into the structure.
And this illustrates something we tell homeowners all the time:
Sound dampening isn't just about which products you buy. How those products are installed matters enormously.
You can spend thousands of dollars on premium sound-control materials and still compromise the assembly through seemingly minor installation mistakes.
Why We Often Move the Resilient Channel Forward in a Multi-Layer System
For that reason, when we're using SONOpan plus resilient channel plus two layers of 5/8" drywall, we often prefer this arrangement:
Framing
↓
SONOpan
↓
Resilient Channel
↓
First Layer of 5/8" Drywall
↓
Second Layer of 5/8" Drywall
↓
Finished Surface
This gives us several things we're looking for.
We have SONOpan helping control sound across the framing.
We have resilient channel creating separation.
We have an air space created by the channel.
And then we have two heavy layers of 5/8" drywall together on the isolated side of the assembly.
It also allows us to use more practical fastener lengths while reducing the chance of accidentally driving our drywall fasteners through the resilient system and back into the framing.
From an installation standpoint, we find this arrangement much more practical.
And from a sound-dampening standpoint, we like having those two heavy drywall layers together on the isolated side of the resilient channel.
So Which Way Is Better?
The answer depends on the assembly.
If we're installing:
SONOpan + Resilient Channel + One Layer of 5/8" Drywall
we generally prefer:
Framing to Resilient Channel to SONOpan to Drywall
This keeps SONOpan and drywall together while isolating both from the structure.
If we're installing:
SONOpan + Resilient Channel + Two Layers of 5/8" Drywall
we often prefer:
Framing to SONOpan to Resilient Channel to Drywall to Drywall
This keeps the two heavy drywall layers together on the isolated side, creates an additional separation within the assembly and gives us a much more practical fastening arrangement.
This is an important distinction because we don't believe sound-dampening systems should simply be installed according to a memorized formula.
We look at the complete assembly and determine how all of the components are going to work together.
Tested Assemblies vs. Custom Assemblies
There's one other distinction we think homeowners should understand.
Manufacturers such as SONOpan publish specific assemblies that have been laboratory tested for sound transmission.
If we're building one of those exact systems and an STC rating is important to the project, then the assembly needs to follow the tested design and manufacturer's installation requirements.
If we change the order of the materials, fasteners, framing or other components, we shouldn't automatically claim the same laboratory STC rating.
That doesn't mean a custom assembly can't perform extremely well.
It simply means we're not going to advertise a laboratory number that belongs to a different construction.
For many residential projects, we're designing a practical sound-dampening solution based on the home, the noise problem, available space, budget, manufacturer recommendations and our own installation experience.
And we'll explain that distinction clearly.
It's the Entire Assembly That Matters
This is why we don't look at resilient channel, SONOpan, insulation or drywall as individual solutions.
We're thinking about the entire path sound has to travel.
Absorption inside the cavity.
Sound-dampening material across the framing.
Separation and decoupling.
Air space.
Mass from multiple drywall layers.
Proper sealing around the perimeter and penetrations.
And just as importantly:
Making sure our fasteners don't accidentally reconnect everything we're trying to isolate.
That's how we approach sound dampening at Devlin Drywall.
We're not simply stacking products together.
We're thinking about what each layer is doing, and how every layer interacts with the next one.
Step 4: Adding Mass
Once we've addressed the cavity, soundboard and separation, we need to think about the finished wall or ceiling itself.
This is where drywall becomes an important part of the sound-dampening system.
Generally speaking, more mass makes it harder for airborne sound energy to move through an assembly.
For this reason, we typically use 5/8" drywall rather than lightweight 1/2" drywall when sound reduction is a priority.
From here, customers have several options.
And this is where we can customize the system based on how important sound reduction is and how much you want to invest.
Option 1: One Layer of 5/8" Drywall
This is our more economical drywall option.
Combined with other sound-dampening components such as Safe'n'Sound, SONOpan and potentially resilient channel, a single layer of 5/8" drywall adds meaningful mass without dramatically increasing the cost or thickness of the assembly.
For homeowners who simply want to improve sound separation rather than create an extremely high-performance room, this can make a lot of sense.
Option 2: Two Layers of 5/8" Drywall
The next step is adding another layer.
Two layers of 5/8" drywall create considerably more mass than a single layer and can form part of a much stronger sound-control assembly.
We also offset joints where appropriate so we're not simply lining up potential weak points from one layer to the next.
This is often an attractive middle ground.
You're using readily available drywall products while building substantially more mass into the wall or ceiling.
For many residential projects, this can provide a very good balance between cost and performance.
Option 3: QuietRock Sound-Reducing Drywall
From there, we can step into specialty acoustic drywall.
QuietRock is engineered specifically to reduce sound transmission.
Rather than being simply another heavy sheet of drywall, QuietRock products use specialized sound-damping construction within the panel.
There are several QuietRock products available depending on the application. Some are designed as relatively economical residential sound-control panels, while higher-performance versions are engineered for more demanding applications and lower-frequency sound.
This gives us another way to increase the performance of the assembly without simply continuing to stack ordinary drywall indefinitely.
QuietRock costs considerably more than standard drywall, so we don't automatically recommend it for every project.
Again, we're looking for the best use of your budget.
Option 4: QuietRock Plus 5/8" Drywall
One combination we particularly like is:
One layer of QuietRock combined with one layer of 5/8" drywall.
This gives us the sound-damping properties of the specialty QuietRock panel along with the additional mass of conventional 5/8" drywall.
There's also a practical finishing advantage.
We typically prefer having standard drywall as the final finished surface.
Our drywall finishers work with it every day, and it gives us a familiar surface for taping, finishing and creating the final wall or ceiling.
So rather than asking one material to do everything, we're using different layers for different purposes.
Sound control underneath. A beautiful finished drywall surface on top.
Option 5: Two Layers of QuietRock
For customers looking for an even more substantial assembly, two layers of QuietRock can also be considered where appropriate.
At this point, however, we're getting into a considerably more expensive sound-dampening system.
And that's where we have another conversation with the customer.
What are we actually trying to accomplish?
If we're separating ordinary living spaces, there may be a point where spending significantly more money produces diminishing practical benefits.
If we're building a serious home theatre, music room or another space where sound isolation is extremely important, investing more may make sense.
Technically, assemblies can go even further.
Three layers.
Specialized isolation systems.
Additional mass.
More complex framing assemblies.
But in residential construction, we've found that most homeowners simply don't need to go that far.
We've yet to have a customer ask us for three layers of sound drywall.
There's usually a much more sensible solution before we reach that point.
You Don't Necessarily Need Every Layer
This is probably the most important part of our approach.
We're not going to tell every homeowner:
"You need Safe'n'Sound, SONOpan, resilient channel and two layers of QuietRock."
That could create an excellent assembly.
It could also be far more than you actually need, or want to pay for.
Instead, we can mix and match these components depending on your situation.
For example, one project may use:
Safe'n'Sound + SONOpan + 5/8" drywall.
Another might use:
Safe'n'Sound + SONOpan + resilient channel + two layers of 5/8" drywall.
A more demanding project might incorporate:
Safe'n'Sound + SONOpan + resilient channel + QuietRock + 5/8" drywall.
The important part is understanding that we're building a system, not simply selling you a product.
Sound Can Find the Weakest Point
There's another part of sound dampening that's easy to overlook.
You can build an excellent wall or ceiling and then compromise it with openings.
Pot lights.
Electrical boxes.
HVAC penetrations.
Doors.
Gaps around the perimeter.
Plumbing penetrations.
Sound can travel through surprisingly small paths.
That's why acoustical sealants, proper detailing and treatment around penetrations can be important parts of a higher-performing assembly.
SONOpan specifically recommends sealing perimeter gaps and penetrations, and QuietRock's manufacturer also provides acoustical sealants and putty products designed to address joints and electrical boxes in sound-control assemblies.
A sound-dampening system is only as good as the details that connect it together.
What Does STC Mean?
While researching sound dampening, you'll probably come across something called an STC rating.
STC stands for Sound Transmission Class.
In simple terms, it's a laboratory rating used to describe how effectively a wall or floor/ceiling assembly reduces airborne sound transmission.
Higher generally means better airborne sound isolation.
But we don't like using STC numbers as marketing promises.
Why?
Because the rating applies to a specific tested assembly, not simply one individual product.
Change the framing.
Change the insulation.
Change the number of drywall layers.
Change the fasteners.
Add penetrations.
Install something incorrectly.
And the real-world performance can change.
That's why when you see a product advertised with an impressive STC number, it's important to ask:
“What complete wall or ceiling assembly produced that number?”
For example, SONOpan publishes tested assemblies incorporating insulation, SONOpan, resilient channel and two layers of 5/8" drywall with ratings in the mid-to-high 50s, but those ratings belong to those specific assemblies and installation conditions, not to SONOpan alone.
We'd rather explain that honestly than promise you a laboratory number your finished home may not reproduce.
Can We Completely Soundproof a Room?
We prefer the term sound dampening for a reason.
Completely eliminating sound transmission in an existing residential home can be extremely difficult.
Sound doesn't only travel straight through the wall or ceiling we're working on.
It can travel through floors, framing, ducts, adjacent walls and other connected parts of the structure. This is known as flanking transmission.
Impact noise and low-frequency bass can be especially challenging.
So we're careful about promising “soundproof.”
What we can do is design an assembly intended to significantly reduce the amount of sound travelling between spaces.
How far we go depends on your goals and budget.
We would rather set realistic expectations at the beginning than promise complete silence and disappoint you afterward.
Where Sound Dampening Makes the Biggest Difference
We commonly recommend these systems for:
Basement suites and rental units where privacy between floors matters.
Bedrooms and bathrooms where conversations and everyday household noise are an issue.
Home offices where you need a quieter environment for calls and concentration.
Laundry and mechanical rooms where equipment noise travels into living areas.
Home theatres and entertainment rooms where both incoming and outgoing noise matter.
Shared walls where sound travelling between rooms has become frustrating.
And sometimes it's simply a homeowner saying:
“I can hear everything upstairs. What can we do?”
That's where the conversation starts.
We'll Help You Decide Where Your Money Is Best Spent
Sound dampening can become expensive very quickly if you simply keep adding products.
Our job isn't to sell you every layer available.
It's to help you understand which layers are likely to give you the most value for your particular problem.
We'll talk about what kind of noise you're dealing with.
We'll look at the existing construction.
We'll consider how much space we have available.
We'll discuss how much ceiling height or wall thickness you're comfortable losing.
And we'll talk about your budget.
Then we'll recommend a system.
Sometimes the answer may be relatively simple.
Other times, it may be worth investing in several different layers.
We'll give you the options and explain what you're paying for at each level.
Then you can decide how far you want to go.
One Team From Sound System to Finished Wall
One of the biggest advantages of having Devlin Drywall complete this work is that sound dampening usually becomes part of a drywall project anyway.
We're already working with the materials involved.
Insulation.
Soundboard.
Resilient channel.
Drywall.
Specialty acoustic drywall.
Finishing.
And if required, painting.
That means we can build the sound-dampening assembly and then take the wall or ceiling all the way through to its finished appearance.
When we're done, you shouldn't be looking at a collection of soundproofing products.
You should simply see a beautiful finished room that feels noticeably quieter.
One team. One standard. One company responsible for the finished result.
Let's Build the Right System for Your Home
If noise between rooms or floors has been bothering you, you don't need to figure out all of these products yourself.
That's what we're here for.
Tell us what you're hearing.
Tell us where the noise is coming from.
And tell us what you're hoping to accomplish.
We'll explain the different options, from a relatively economical upgrade to a much more comprehensive sound-dampening assembly, and help you decide what makes sense.
Because the goal isn't to install the most expensive soundproofing system possible.
The goal is to create a quieter, more comfortable home using the right combination of materials for your situation.
And then we'll take care of everything from the sound-dampening system through to the finished drywall.
Leave the Dusty Work to Us.
Still looking for help?
Tell us a little about what you need help with and, if you can, send us a few photos or a video. No pressure. No obligation. Just friendly, straight forward advice from an experienced team.